Tuesday, January 28, 2014

My brown eyed girl...

Ok, so after a flood of responses from yesterday's blog about highlighting and contouring, I was reminded by a few people that I never posted about the golden smokey eye. Whoops!! So sorry! So here it is...

My brown eyed girl. I am a brown eyed girl. I remember in middle school and high school ALL I wanted to have were blue eyes. I contemplated getting contacts just so I could have these coveted blue eyes. SO ridiculous now that I look back. I've come to LOVE my brown eyes. And the gold and green specks inside of them. Which brings me to my point of a golden smokey eye. Usually brown eyes can rock ANY color/color combo of eye shadows. Just because, brown eyes are that awesome. But I was finding when I was doing a smokey eye with grey tones and black tones, it would be cute, but wouldn't exactly highlight the warmth and goldfish tones of my eyes and skin. I still think that the black and grey combination for a typical smokey eye is harsh on blue, green and hazel eyes as well. So, I wanted to share my smokey eye redo. This golden smokey eye can be used on ANY color eye and for any occasion. If you want it darker for your girls night out at the club, add some more black or dark brown in the areas that I talk about in the step by step instructions. If you want it lighter, lighten it up. It's a great everyday look and easy to accomplish! Enjoy!

Step 1: Cleanse, moisturize and use your eye cream. I ranted about this yesterday and I'm hoping that I don't have to mention again why you should do that key trio...every. single. day. Here is my naked eye that I started with!

Here it is! THE naked eye!


Step 2: Add your base shadow. I like to use something called a liquid illuminator or cream shadow. You want something with an eye primer built into it, or use eye primer separately with a neutral/light shadow if you don't have a cream shadow base to work with. The most important thing is to always have something as a base with some kind of eye shadow primer in it. Because other wise your shadows will fall onto your face and crease throughout the day. Add the cream shadow/basic light shadow from the inside of your eye all the way up to your eye brow. 

Liquid illuminator 

Ignore the creepy smile. :-) 


Step 3: Once you've applied that shadow all over your lid and all the way up to your brow line, we are going to add one more layer of highlight. Some people are saying that it's "unnecessary" to do this, or looks juvenile, but I think adding in some extra highlight only makes my eyes pop more. To each their own right?! I am adding a photo below of the two different Mary Kay shadow trios that I'm using for this look. You don't HAVE to use these specific ones, just use similar colors. I also am posting a pic of the brushes that I'm using for this look. Take the flat brush, and dust some of the white/lightest color you have in the corner of your eye and the top edge part of your eye brow. 

Mary Kay @ Play Shadow Trios

LtoR: Flat brush, rounded brush, smudging brush. 

Apply white shadow to inner corner

And to the top edge part of the eye brow

Step 4: GREAT JOB!!! haha. Alright, next step. Find the color, I like the one in the earth tone palette on the edge. Combination of granite/toffee tone. But sparkly! We all know how much I like sparkles. :-) I apply that color all over the lid and up to the crease/pocket. Everyone's crease is different on their face, so saying "apply all the way to the crease" is a bit too general. Look in the mirror and find when you open your eye and look straight on, where your eye socket pocket it. That's where you want to bring this middle color to. And if you make a mistake, NO WORRIES!! Nothing is permanently tattooed onto your eye so relax. 

This is where my eye socket pocket is. Bring the shadow all the way to there. 

Ugh...sorry about the towel. I meant to crop these, But that just takes SO much time!

Step 5: Time for your accent tone. I like to use a mix of the brown and lighter granite color we just used. Just swirl them together and apply to the V on the edge of your eye. pics below show exactly where to apply. This creates some depth in the corner of your eyes. It draws the eye up and gives you a mini eye lift! Just blend in with the rounded brush, like a wind shield wiper, back and forth. Blend those babies together until there aren't any harsh lines of shadow visible. 

Mix the brown and lighter toffee color together. For a softer look. For a darker look, try just the brown. 

Top of the v in the corner of your eye. 

Bring it down to the edge of your eye and sweep across the bottom. 

Deer in headlights much?! Anyway, this kinda shows what the brown looks like once it's been blended.


Step 6: Liner. Liner. Liner. I love eye liner. It brings a sultry look to your eye. I like to use a gel or a liquid liner. The one I'm using today is a gel liner. For the love, DO NOT PULL THE EDGE OF YOUR EYE!!! You are almost guaranteeing yourself to have some wicked bad crows feet. I start at the edge of my eye and work my way in with the liner. And if it goes on too thick, or a little messy, no worries! Just use a q-tip to smudge and move along. 

Mary Kay's gel liner

Outside and work your way in

Pre-smudge. Depends how feisty I'm feeling if I smudge or not! 

Step 7: Time for another layer of awesomeness! This is where the other palette comes in! I like to add a bit of black to the edge to finish the look. Black and grey alone for smokey eyes is too harsh in my opinion, but adding some black to ANY shadow look always works great! Use the smudging brush, get it a little bit wet and swirl around in the black shadow. You're going to add it in the same place as your eye liner and the dark brown V that we talked about above. Again, less is usually more with black. If you make a mistake, you can always tone it down! 

Black, white and grey shadow trio with smudging brush. 

Sweep across the liner and then add to the v on the edge. 

Voila!

Step 8: Ok. so I always always always do my eye make up BEFORE my face make up. It just always looks better at the end. Finishes better. That way if you have any residual shadow that has fallen on the cheek below, you can scrub that off without ruining your perfectly contoured face! :-) AFTER you apply your face make up and set that with a finishing spray or powder, this next step comes in. I like to line the bottom of my lashes with shadow. I never ever line with liner...I think it's way to harsh. Especially for a fairer toned person like myself. I like to dip a liner brush in some water, and swirl it around in the brown and green shadows and line underneath. 

Dip and swirl!

Less is more peeps!

Step 9: Eyebrows! Holy smokes this post is getting long, BUT eyebrows are so so so important. It frames your eye and completes your look. I hate watching women walk around with beautiful eyes and eye make up but then they forget their eyebrows? What???? That's like purchasing a beautiful painting or getting a wonderful print of photography and just hanging it on the wall with tape instead of framing them. Make sense? I like to use a blondie liner (wood pencil liner) but you can always use a hazelnut colored shadow as well. Less is more with this too! Don't over do. 

Blondie wooden eyebrow pencil 

Compare with the pic above! Finishes the look right?

Step 10: LAST STEP!!!! Mascara. Now, not everyone likes mascara. So, that's fine. But, I really think to have your eyes stand out, you need to throw some mascara on those gorgeous lashes and go! I have a 3 step process with lashes. 1. Curl. 2. Primer. 3. Mascara. I like to use the primer because it conditions my lashes, lengthens them and helps my mascara last longer on my lashes and look cleaner. After curling your lashes add a coat or two of the clear lash primer and let set for about 10 seconds. Then...Mascara. Mascara rules are as follows...start from the lash base and shimmy your way up the lashes. This helps separate them and lengthen as you go. Add a few layers and set. 

LtoR: Curler, Ultimate black mascara, MK lash primer

with primer after curling

Finished!!
Enjoy your new look!!!! Spray your face with some finishing spray if you feel like it. Do your hair and hit the road. Enjoy your golden smokey eye!! I would LOVE to hear who tries it and please forward any suggestions to me!!! Practice makes perfect! If you use the right products, you won't need to even think about wearing falsies. Good luck! Enjoy! 

The complete look! Contouring and golden smokey!
 Seriously. Why does every pic I post look like I'm naked?! I'm not. I swear. 


Monday, January 27, 2014

The Perfect Contour.

Alright buttercups...here's the deal. I have had a lot of customers and girlfriends ask me to do a tutorial about facial highlighting and contouring. I usually do small demo classes with my customers because demonstration is SO important with something like this. Hands on teaching is the best way to master this technique.

First, let's talk about what facial contouring and highlighting is. Basically, it's manipulating the light by using certain make up techniques to thin your nose, thin your face, make your cheek bones pop and the list goes on. There are many reasons that people contour and highlight and I am going to give you a very basic example of what I do for a natural/smooth contour and highlight.

Why do I contour? I contour because I've been cursed blessed with these huge, round Dutch cheeks. On my face and on my caboose. Haha. No amount of contouring will help my back side, BUT I highlighting and contouring most definitely helps me have some definition to my otherwise very round, chubby cheek face :-) I'm not ripping on myself, just owning what I've been given and showing you how I add some definition.

First step, you need the right products. Of COURSE I'm going to endorse Mary Kay products since that's what I use and sell, but whatever you use that's similar to what I'm about to show you, should work perfect. Here's a list of what you'll need...
- Foundation Primer
- Flat Foundation Brush
- A shade of foundation that is a few shades lighter than your skin. I like to use a luminescent foundation for the highlighting portion
- A shade of foundation that about 5 or 6 shades darker than your skin tone. ALWAYS use matte for this step. Do NOT use bronzer for this part of the contouring because otherwise you will be sparkly like a vampire in the light :-)
- Cheek Color
- Finishing Powder (whether that be mineral, finishing, luminescent)

Before I share anything else...let me warn you ahead of time. There are some naked face pics of me on this blog post. And it's quite scary. No judgement please. It's all for the good of teaching the amazing highlight/contouring technique.

Step 1: Cleanse and moisturize. If you are not doing this on a daily basis when you get up and AGAIN before you go to sleep...SHAME ON YOU. For everyday that you don't wash your face, that skin ages 17 days. Do the math. We already start losing collagen elasticity before the age of 16...so please, do yourself a favor and wash your face, moisturize your face and for the love, use a firming eye cream!!! For my soap bar washers...just remember what your family members wash with that bar of soap. Then you're washing that bar on your face...? Sick! Ok, wow...total squirrel trail there. Step 1....cleanse and moisturize! Then add your foundation primer and let it dry. If you don't have a good canvas to start with, no amount of make up will look good.

Ah! Don't judge people...

Foundation Primer. Like silk for the face. Same idea as priming on the wall before you paint


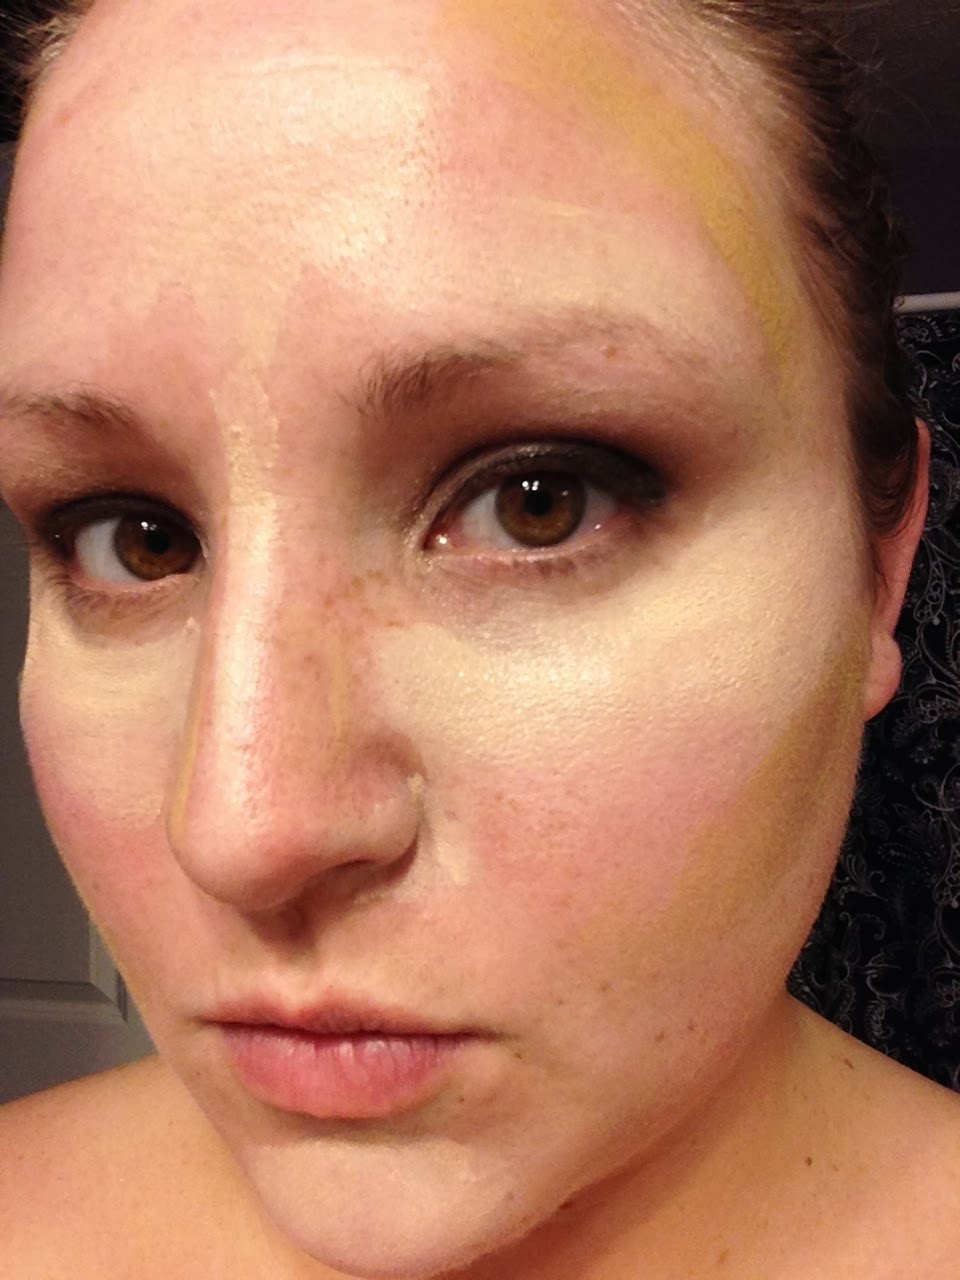
Step 2: Had your highlighting color (lighter one) and your darker contour color on hand and have about a dime size amount set aside and ready to go. You want to add your highlighting foundation on the center of your chin, straight down your nose (gives the illusion of a thinner nose), under your eyes and directly below (see pic below for exact placement) and on the front of your forehead with a dash above each eyebrow. PS, I am NOT naked in these pics...I have a strapless dress on while doing this :-) 


See those huge Dutch cheeks?! 

Step 3: Add your darker contour color. Now remember, what this is doing is manipulating the light and shadows to create darker spots on your face and bring certain spots forward, To either highlight or hide certain parts of your face. You want to add your darker contour foundation to right underneath your cheek bone, a bit down the sides of your nose, and along your hairline and jaw line. It'll be dark, DON'T freak out! We will blend away in a few steps!


Haha...oh lawd! So bad but necessary for you to see

Step 4: My favorite part!! Grab your flat foundation brush (see below) and start with the dark color. Basically, the best word I can describe this action with is buff. Just buff the color into your skin. NOT all over, only where you've put the dark color. We will meet and blend with the lighter after all dark contour is finished. 

Flat Foundation Brush 


Step 5: See? In all my creepy pics?? It's blends right in. You WANT it to be the darker color in those areas. For me, it's because I want to create a shadow on the chubbiest part of my cheeks and face. :-) Next, you want to work into the lighter highlighting foundation. Buff it all over where you've placed it and then work it around to meet the darker areas. What you'll see is a nice air brushed finish with some natural contouring. Some people probably will think this isn't drastic enough, BUT I also don't want my customers or myself to look like a walking advertisement for a bad self tanner. 


Blended vs Not Blended 

Step 6: Once you've buffed all the colors together and are now a paint buffer genius, you can admire your work. Maybe take a selfie?! ha! Ok now, contouring can only do so much for your cheek bones. I used to HATE wearing blush because of my reddish skin tone and fat cheeks....but now that I've messed around and have practiced enough I think I have it down pat. A few rules with cheek color. Blend blend blend. Don't use only one color. Blend two together. I use a darker/brown tone mixed with  a lighter pinkish tone. It will give your cheeks and face more dimension. Think about it like a painting, what group of evergreen trees would look better? A group that was painted with one shade of green? or a group that was painted with multiple shades? That's what I thought. Same rules apply for cheek color and especially eye colors. Anyway, grab your cheek brush and mix your blush colors together, tap off the excess, and do "the suck". See where exactly your cheek bones are. You will want to start there by buffing the color up your cheek bone line and lightly work your way up to just below your temple area. Then, at the end of that, you want to buff a little bit on the apple of your cheek. Not a big blob, be cautious with the blush. Use sparingly. 

Blend together!


Step 7: Grab that translucent powered and buff some around the areas where you used your highlighting powder! If you would like some more definition as far as where you used the darker contouring color, add in some MATTE bronzer and brush that baby on there. Finished product below! 

Translucent Powder 


Yay!!! It's subtle, maybe too subtle for some of you. But most of my customers are pretty conservative and want to be able to change some things on their face without surgery. Contouring is THE BEST way to achieve this. You can literally change the way your nose appears to people simply by contouring. I hope this was helpful and simple enough to follow. I will have pics of my products that I use below. Enjoy!! Happy contouring! 


Products: